Overview
In this article we will discuss our recommended options for selling summer camps or swim classes products that occur over multiple days or weeks. Outlined below is an overview of the setup ahead…
- We will create an initial Summer Camp product to copy for repeating weeks of camps.
- Discuss limiting sales so your camp or class does not go over capacity.
- Add Custom Checkout Fields to get more info on who is coming (child name, age, etc)
- Duplicate and date the initial product for each week the camp or class is offered.
- Automatically show all camps or classes in an Upcoming Product Schedule section on one of the pages of your website.
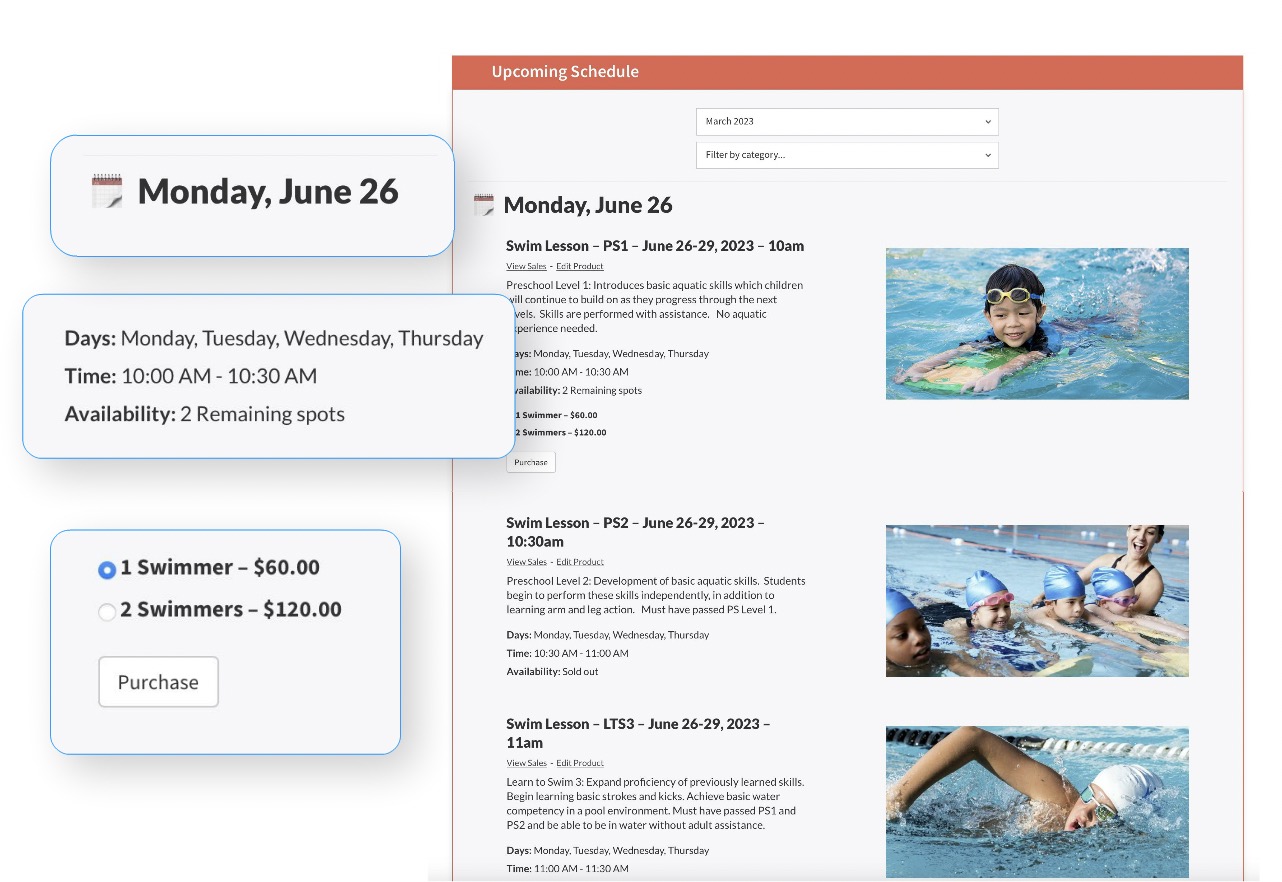
Here is a preview of what a typical schedule would look like below….
For more info on anything product-related, be sure to visit the Products and Shops section of our Knowledge Base.
Create an Initial Product
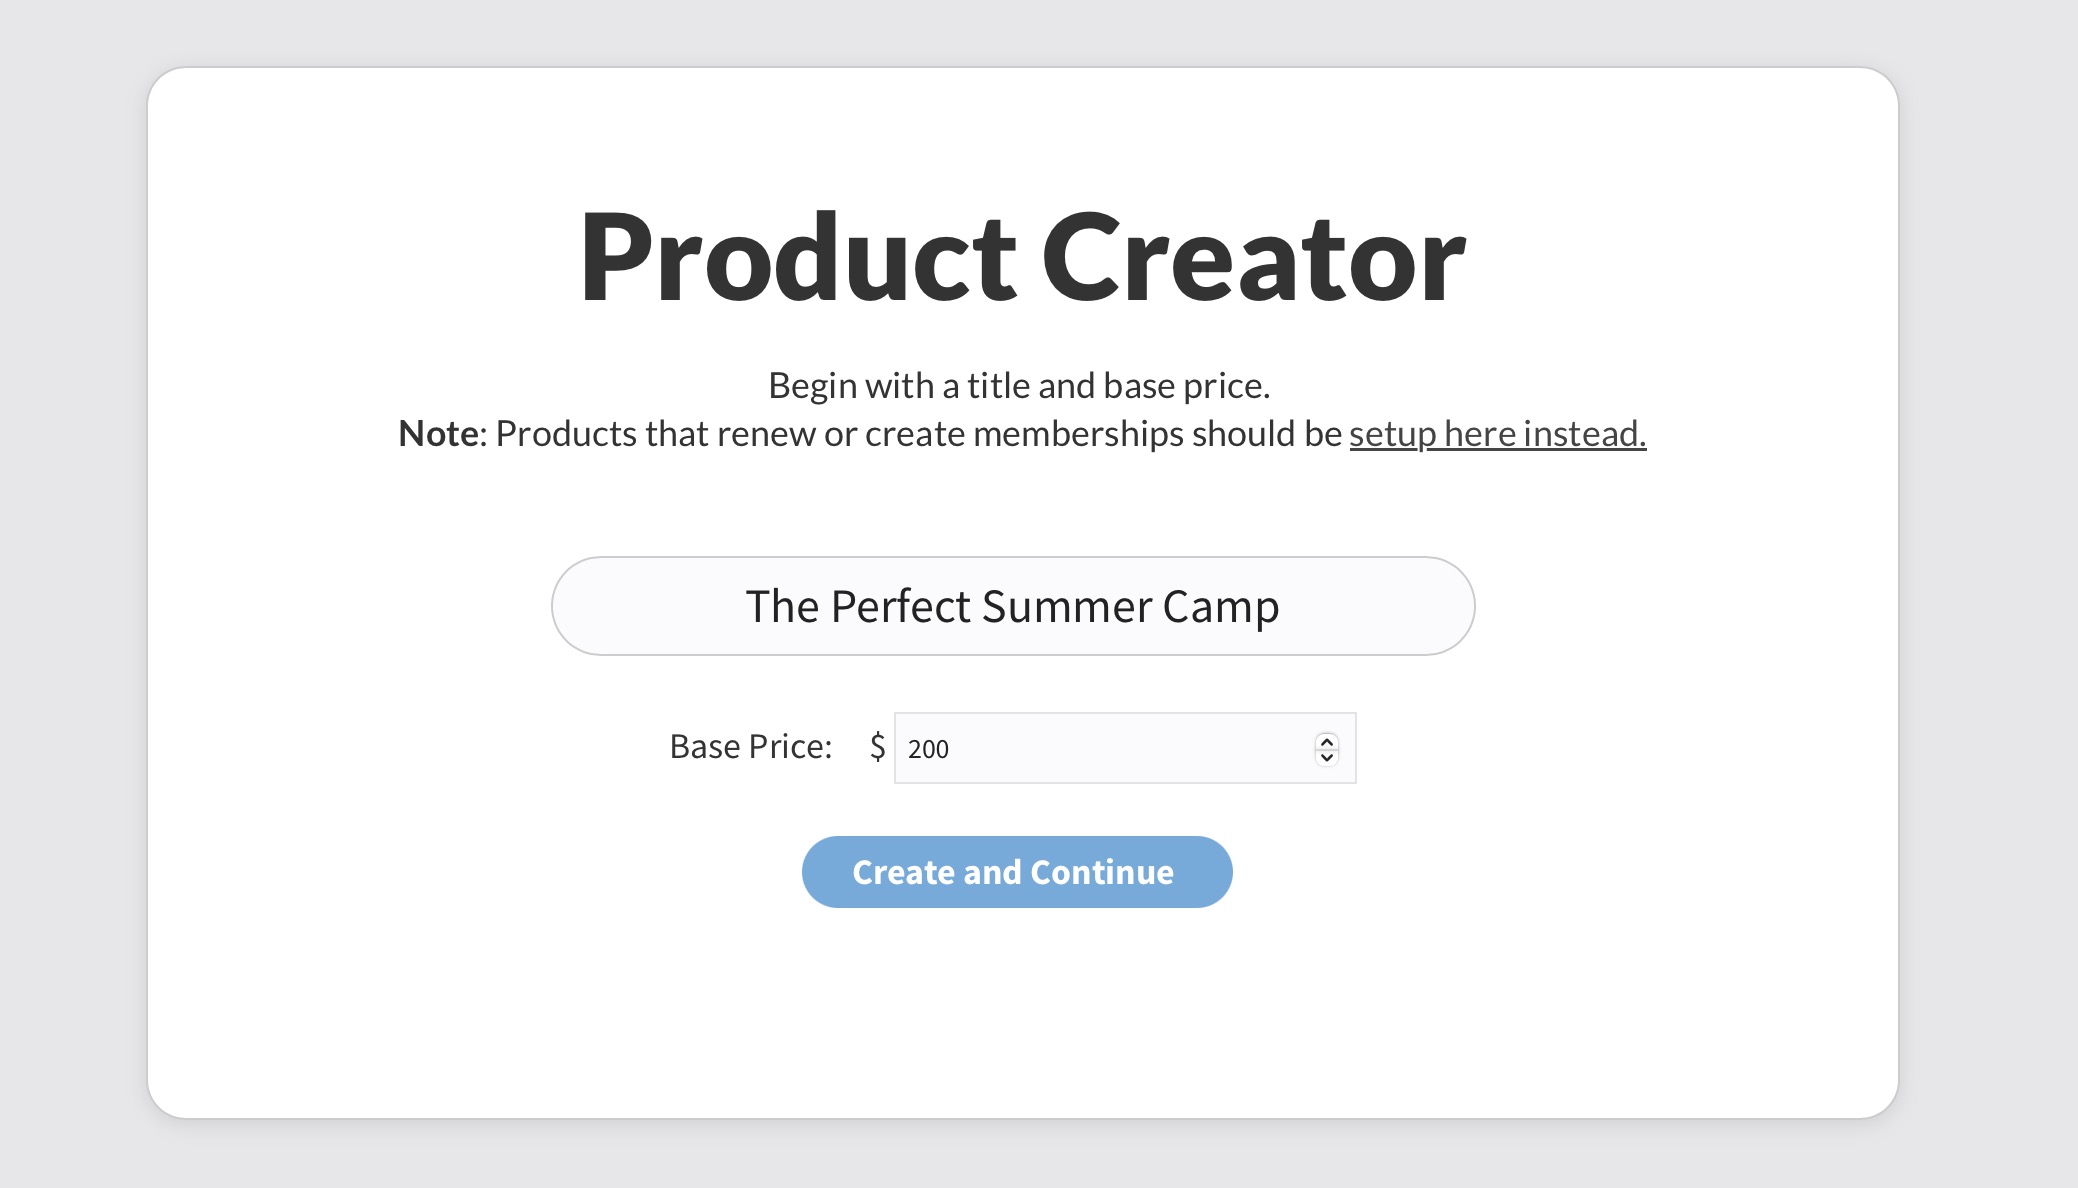
From the Board Member Dashboard go to Financial then Product Creator. Give the product a basic name like “The Perfect Summer Camp”. Add a base price for now…
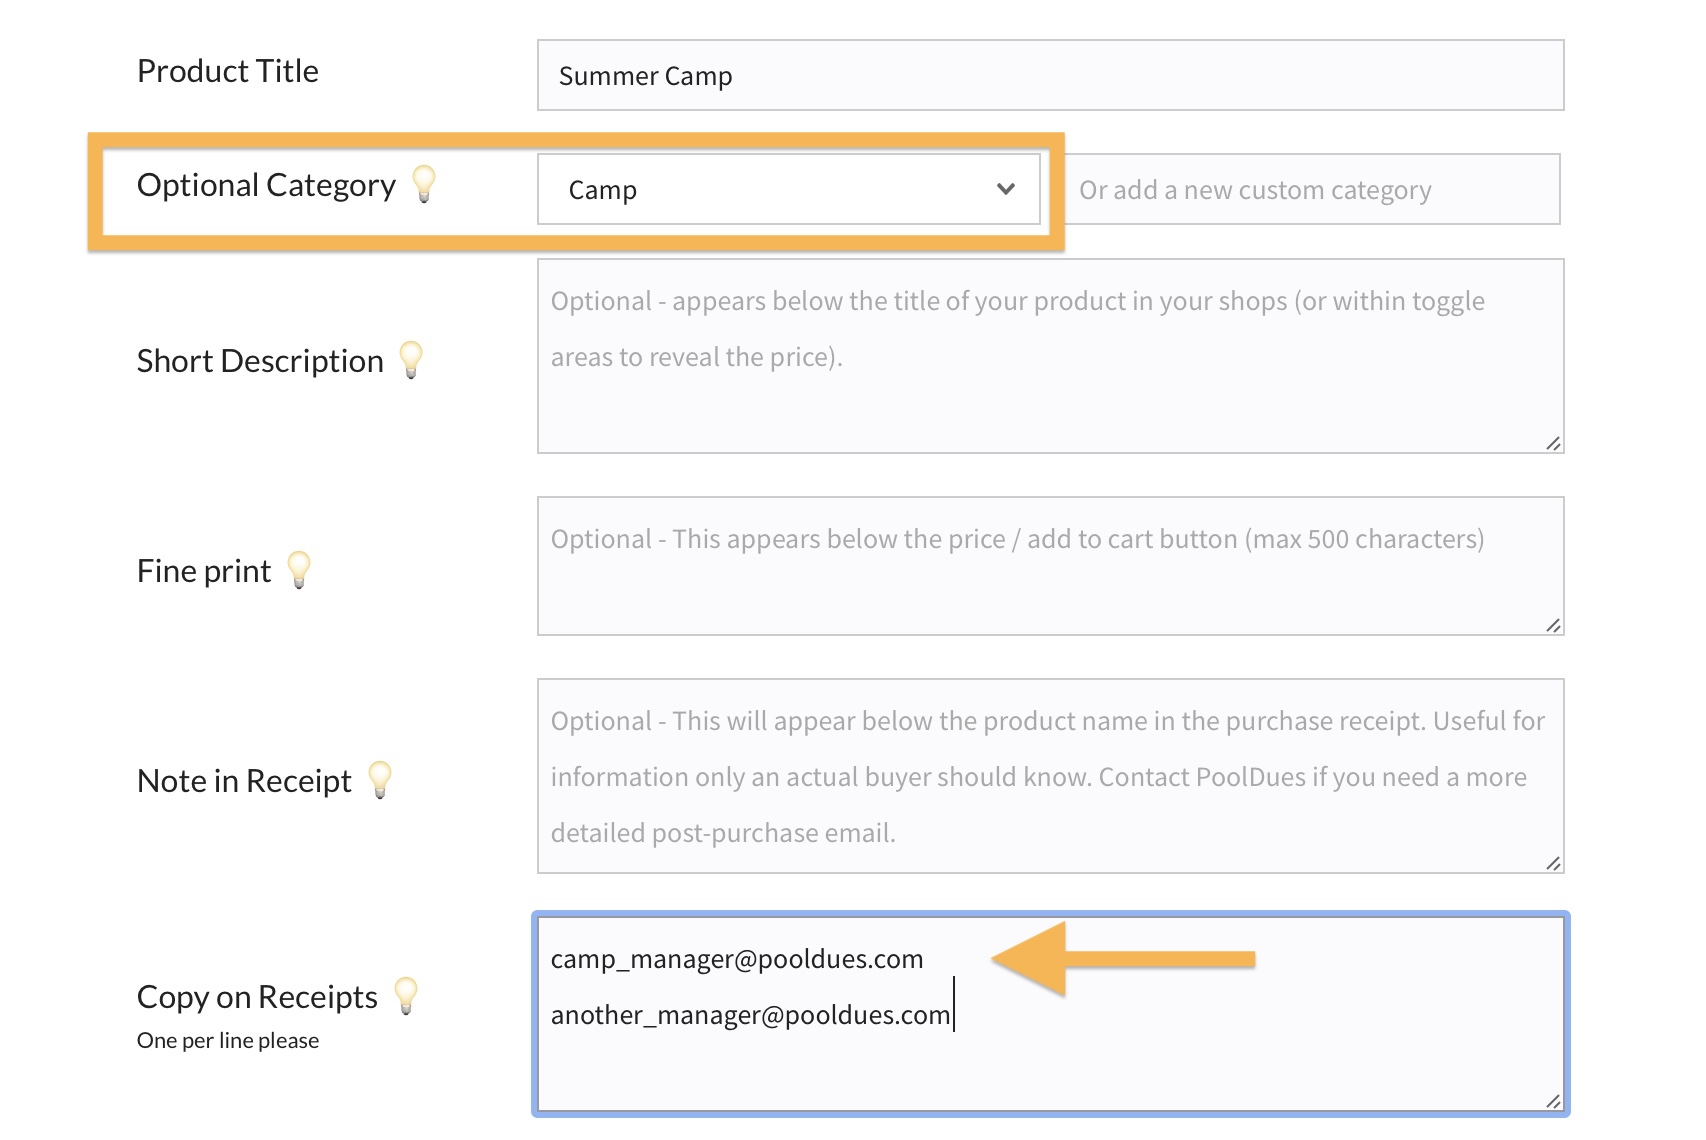
After hitting Create and Continue, you will be on the Basic Settings tab of your new product. Set the Category to “Camp” or “Swim Class” and then set the email addresses of anyone that should be notified when these products are purchased in the Copy on Receipts field.
At this point, you could also write a short description of the camp. When we duplicate the product later, this description (and everything else we set up below will be copied).
Next, head down to the Variable Pricing tab…
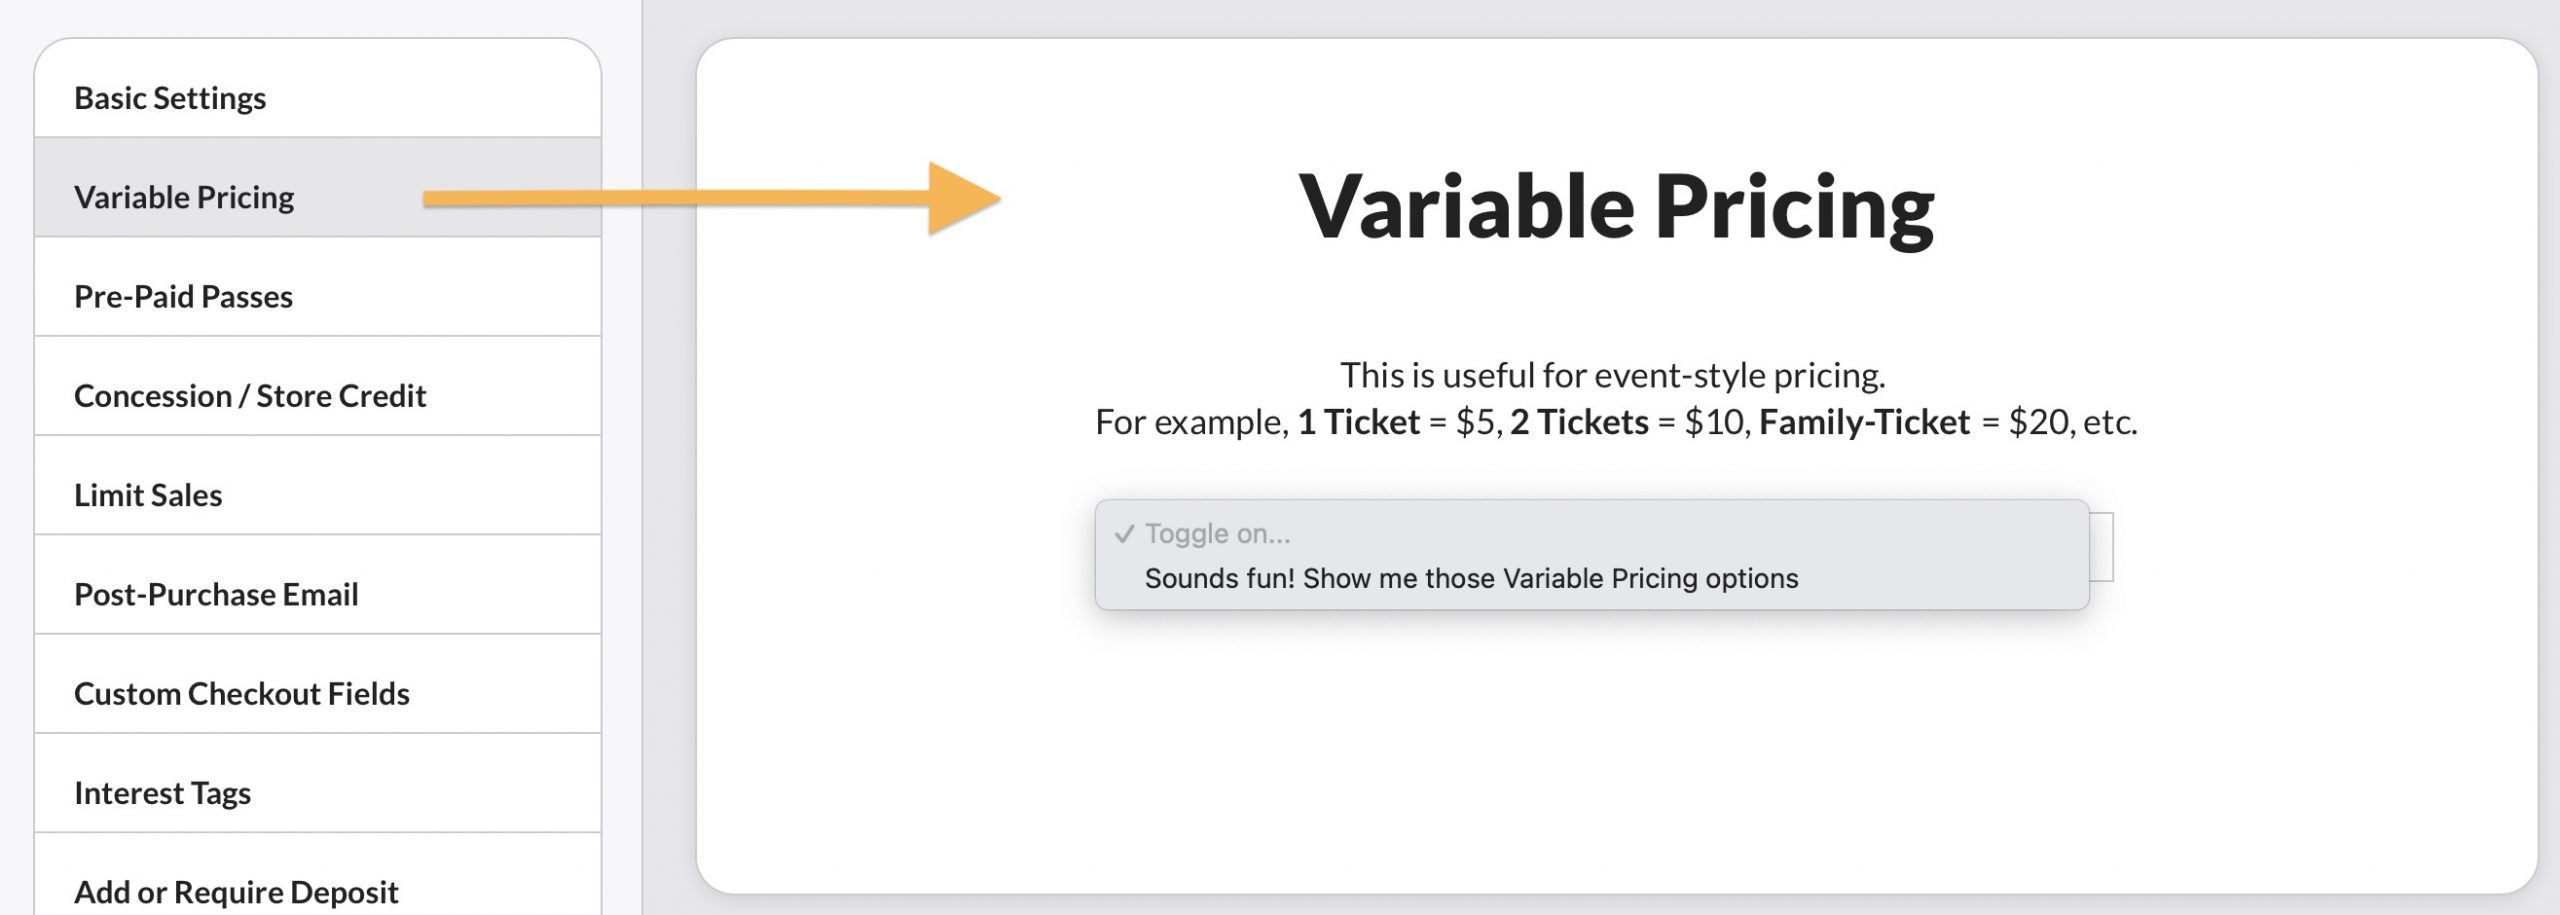
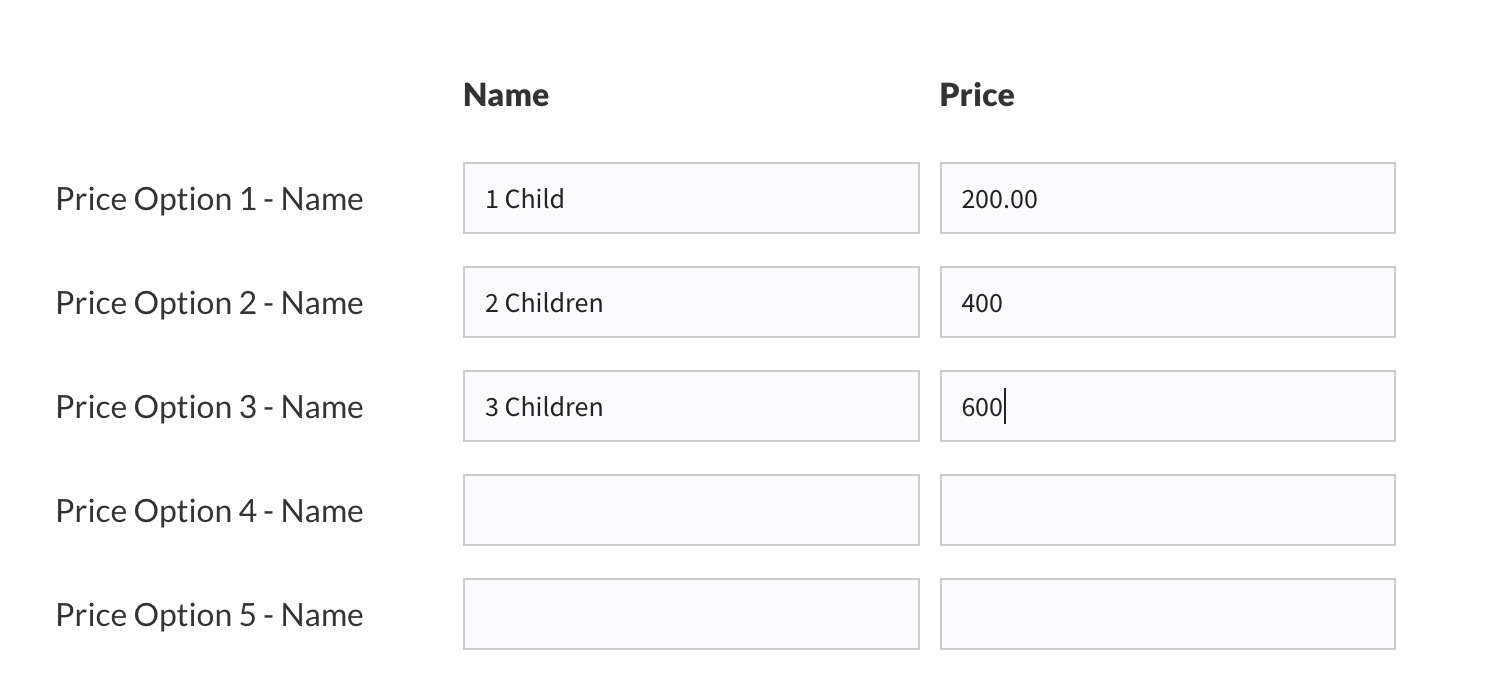
Toggle on this style of pricing so we can add a cost for multiple children. You can see in the screenshot below that the prices can vary based on the number of kids being enrolled. For example, parents might get a price break for more children.
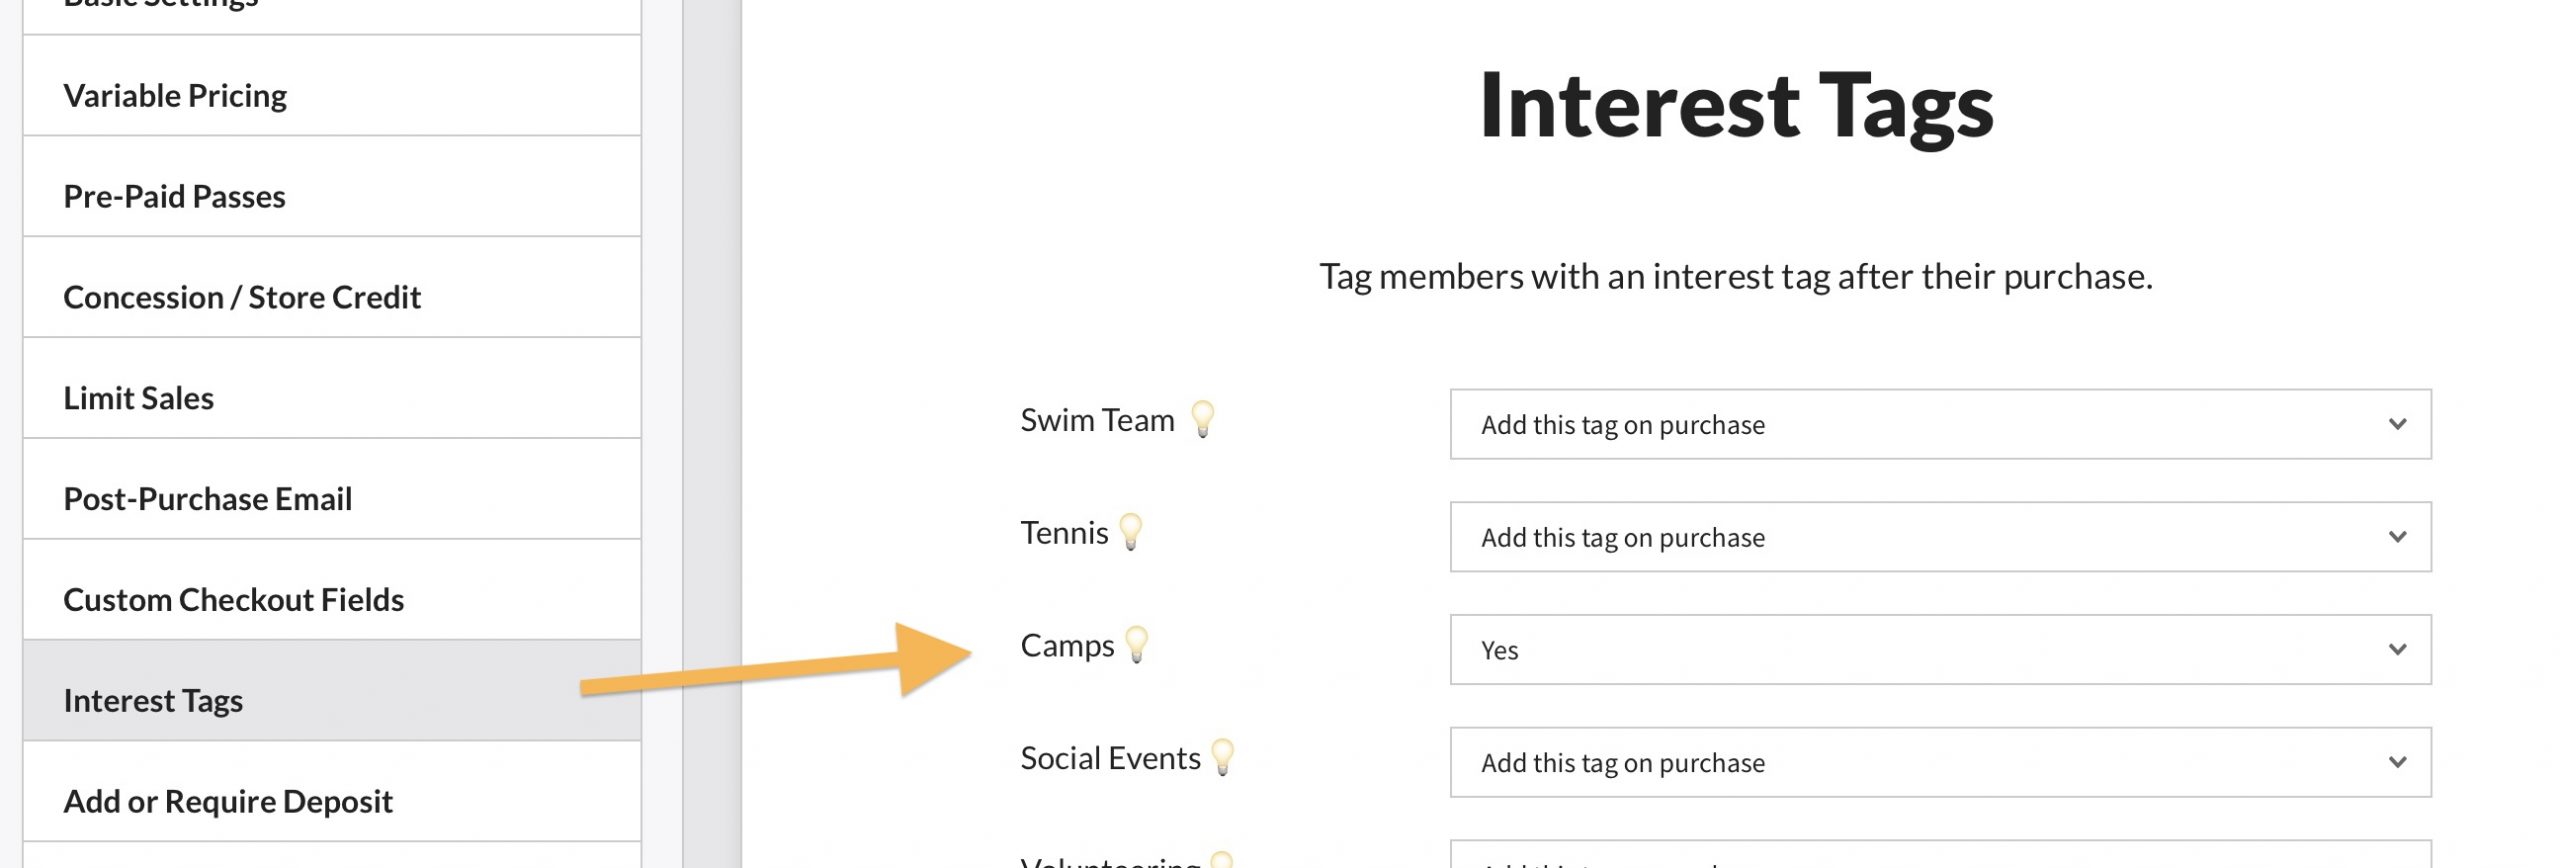
Interest Tags
You can set an Interest Tag of “Camp” for any buyers of this product. Interest Tags are one of many ways your members can be segmented for communication purposes. If a “Camp” Interest Tags does not exist, create one by going to Board Member Dashboard > Members > Interest Tags.
You could also set a Shop Image at this stage as well. If each session (or duplicate) of your camp or clinic will have a unique image you can do that on a per-product basis later.
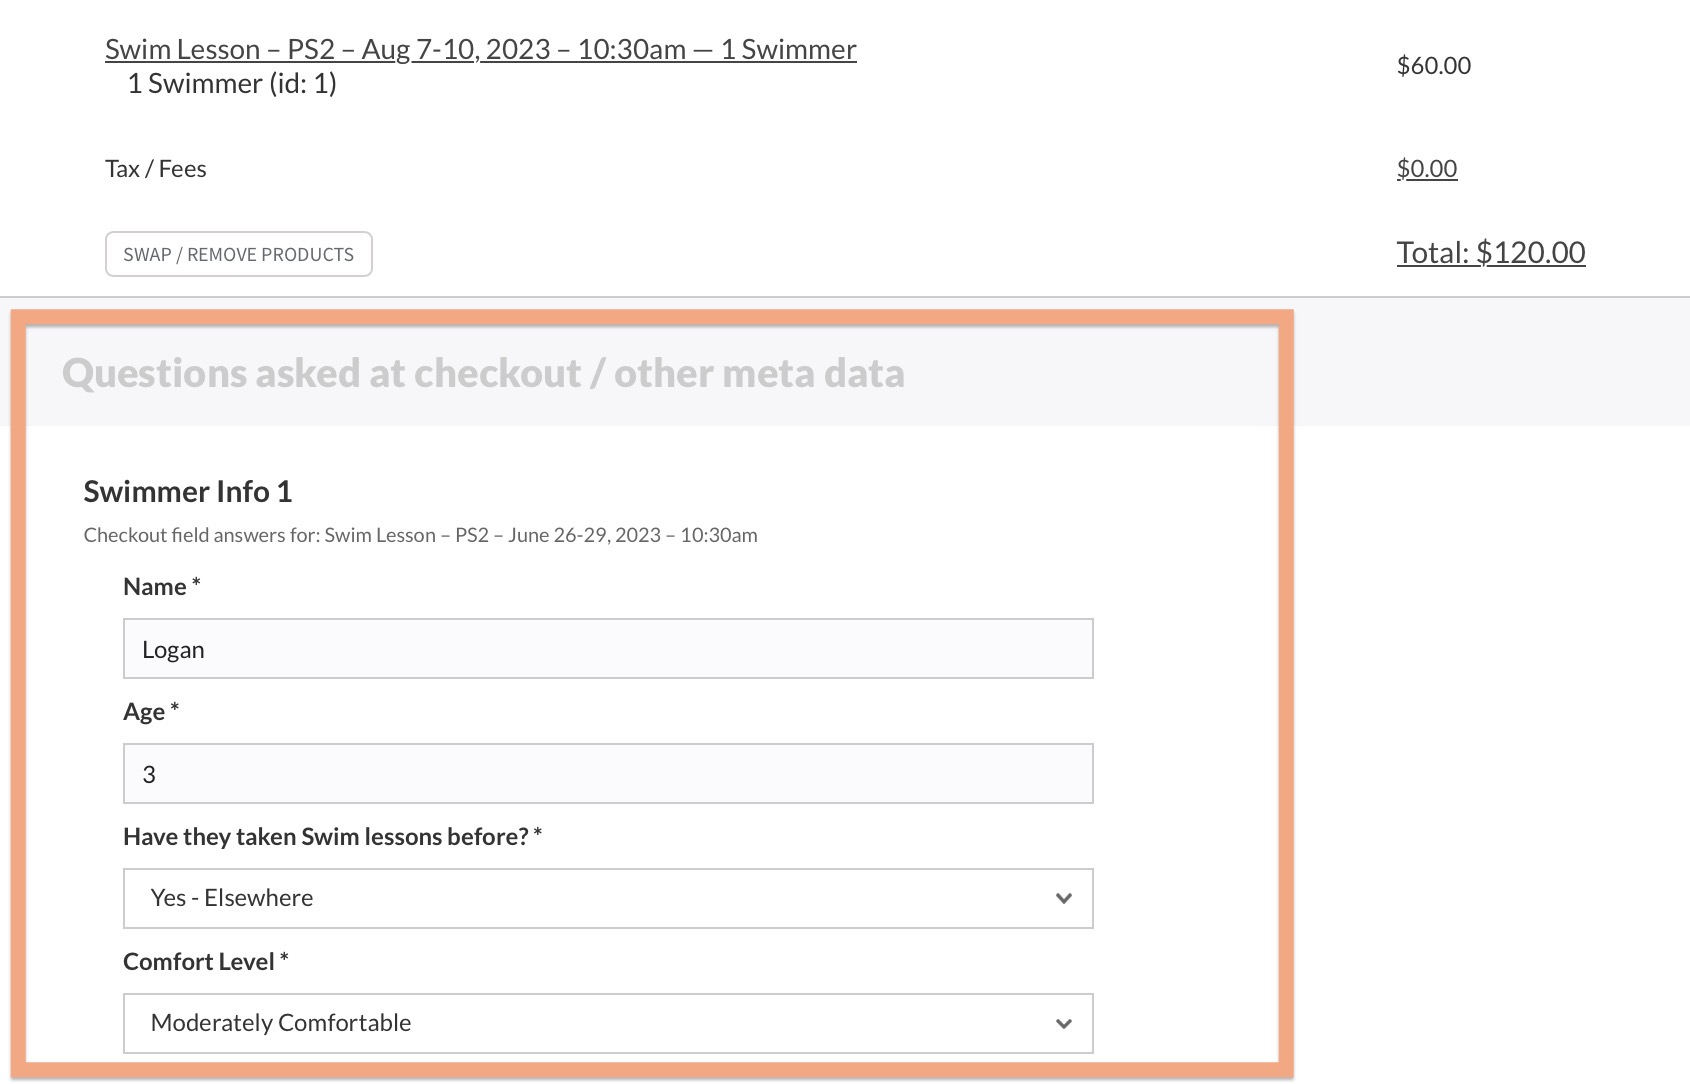
Custom Checkout Fields
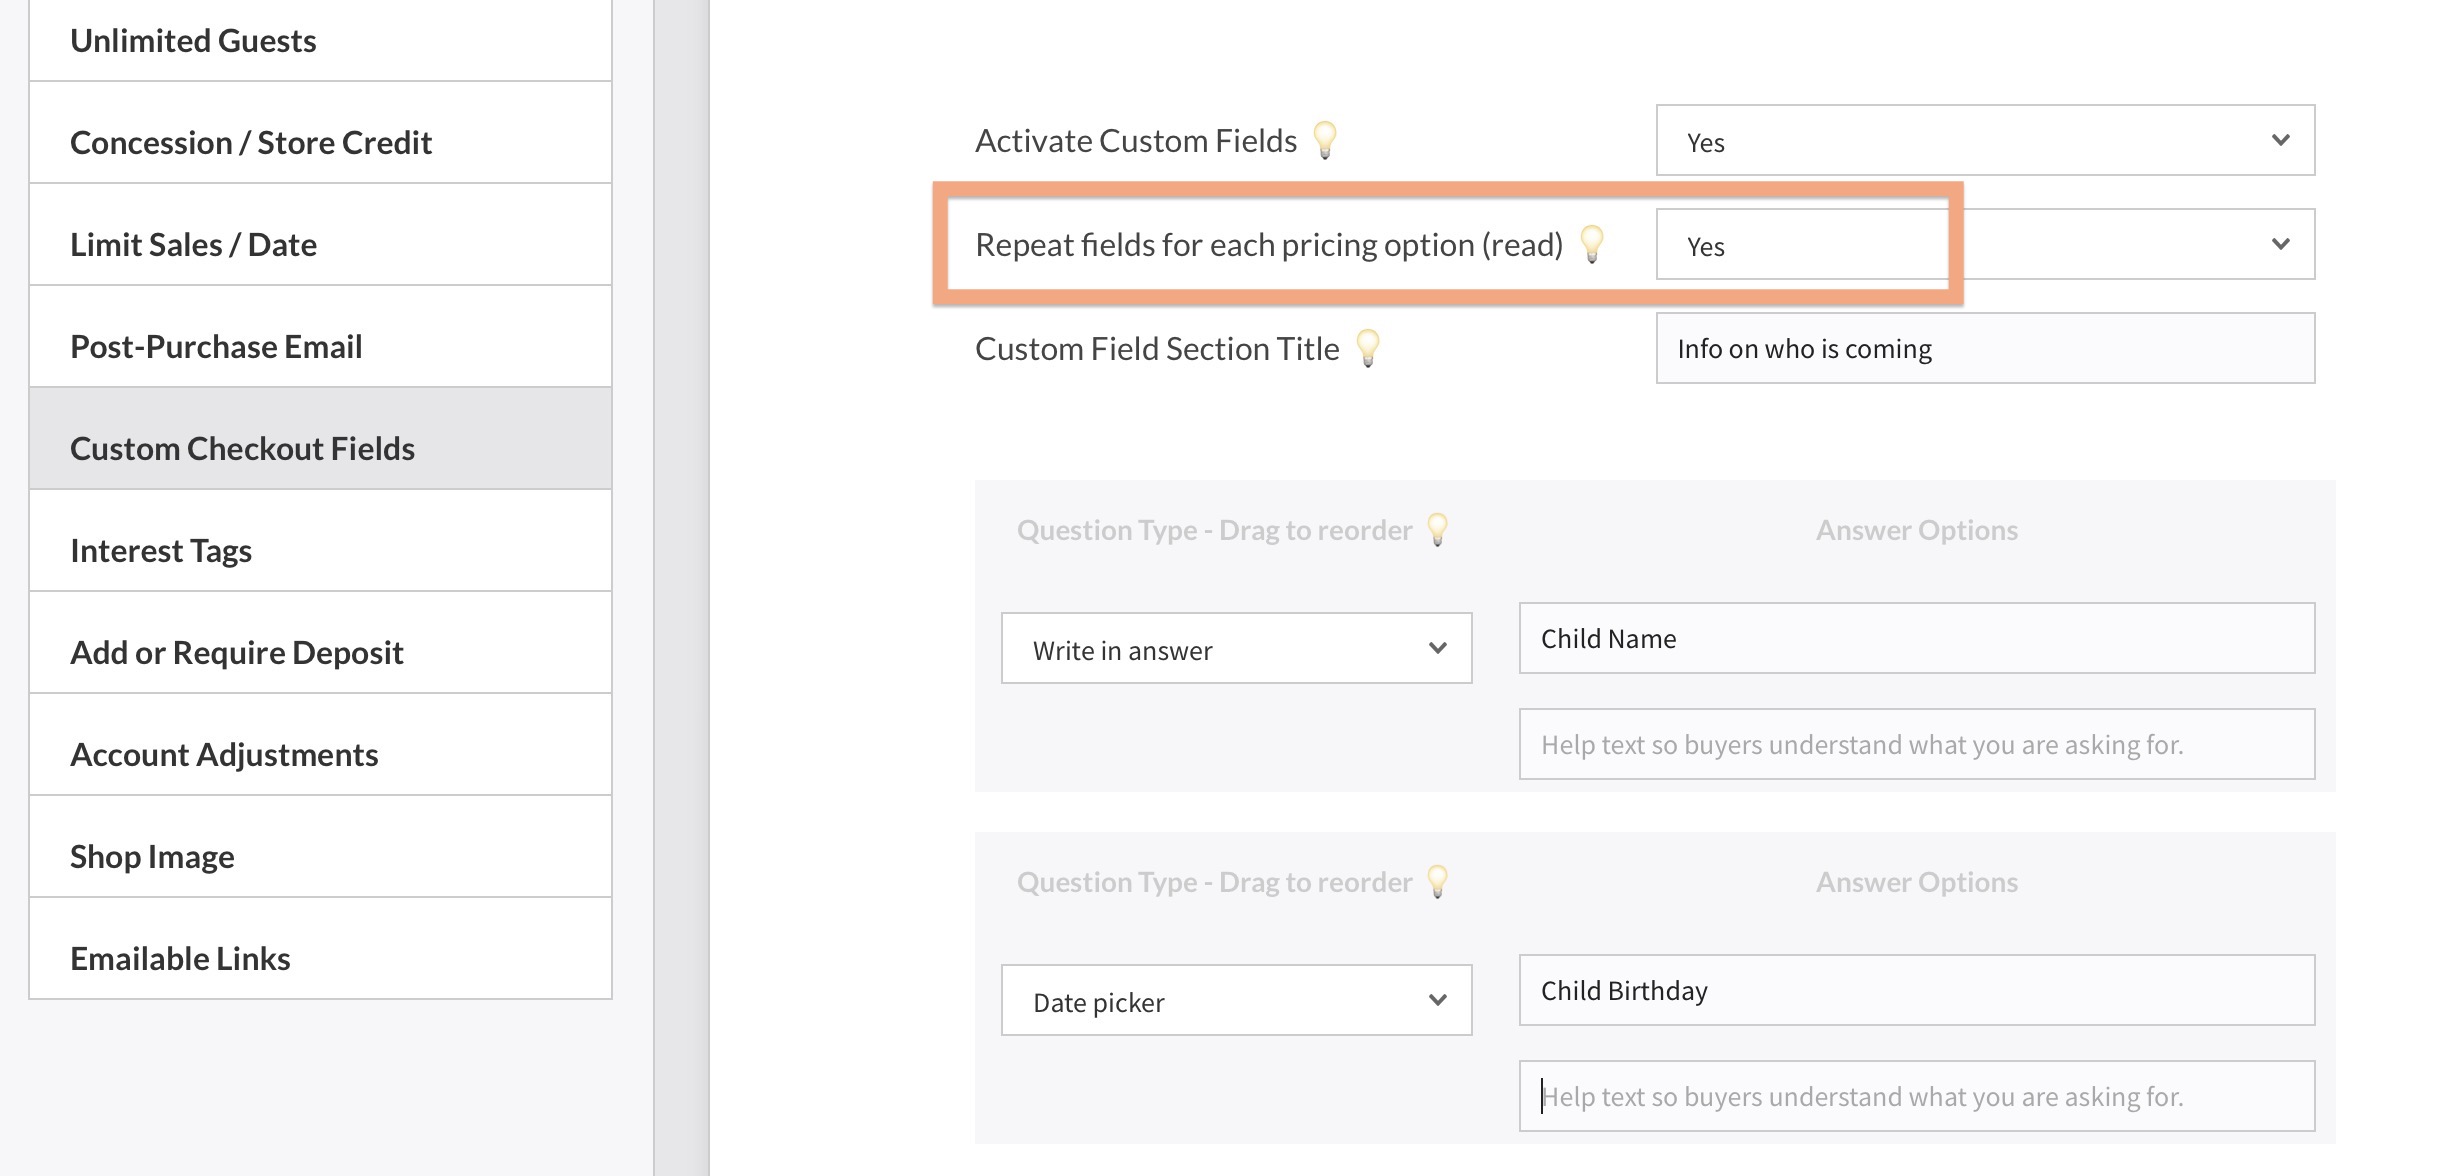
Next, head over to the Custom Checkout Fields tab. This section allows you to add custom fields at checkout IF the product is in the cart. Bare minimum you will probably want to know the name of the child attending. You can add more questions, such as Age, Birthday, T-Shirt Size, whatever.
If your product has variable pricing set, be sure to select Yes for “Repeat fields for each pricing option“. This will repeat these same checkout fields for each variable pricing (i.e. 1 Child, 2 Children, etc).
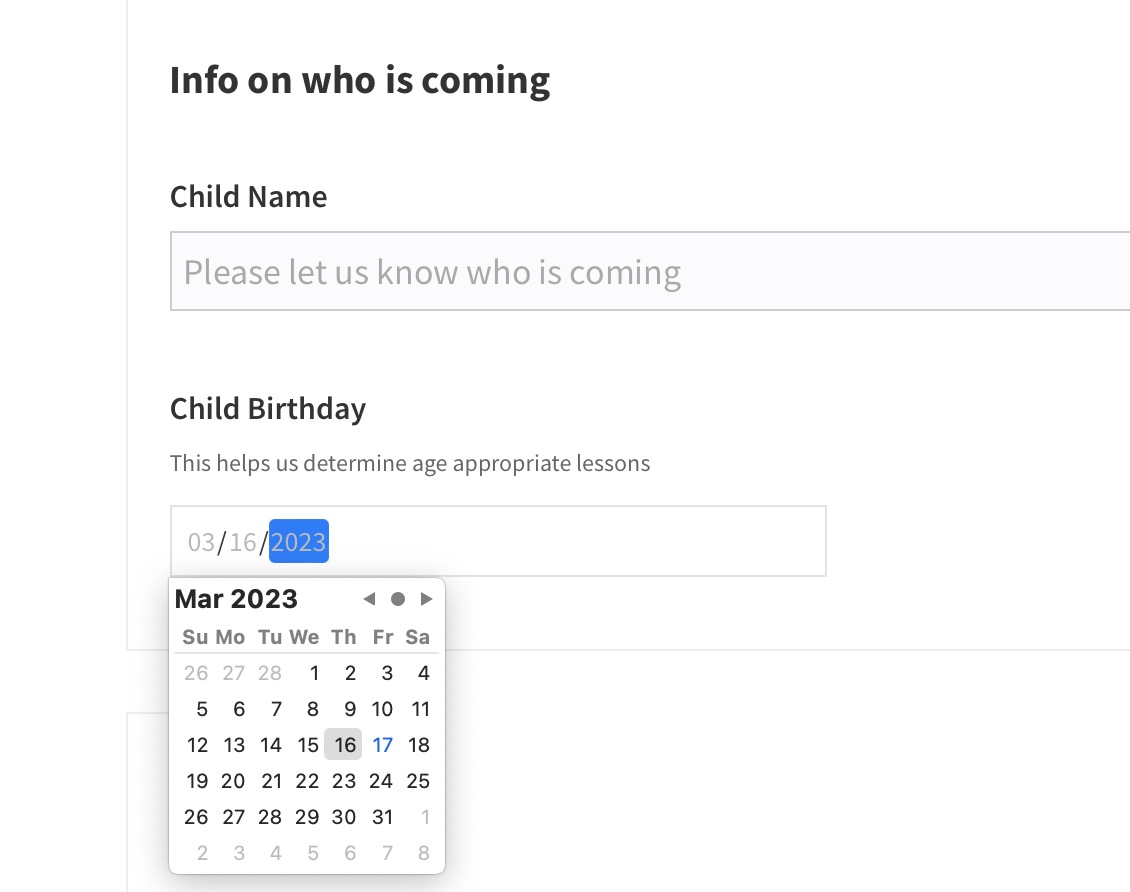
This is how these fields will look at checkout to the buyer.
You can test this yourself at anytime by adding the product to the cart. Look for the “Emailable Links” tab on the left column. From there, simply cut and paste the link into a new browser window.
Custom Checkout Fields in Order History
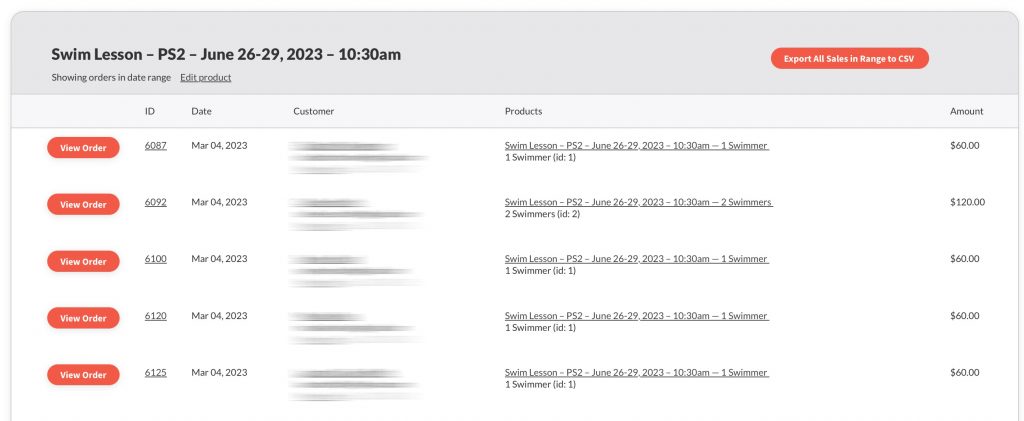
The info buyers provide in these custom checkout fields will be available when you Export the Sales of that product, and also in the Order History for a specific sale. See below…
Exporting Sales with Custom Checkout Fields
For camp / class roster purposes, from Financial > Product Order History, select a specific product, then tap Export Sales in Range to CSV (top left). This will create a spreadsheet file with each buyer’s information as well as any custom checkout fields.
Limiting Sales for Camp / Class Capacity
If only members are allowed to enroll in camps or classes, select the Limit Sales tab in the Product Editor, and set this option…

Next go Max Available for Sale. Here you can set a max capacity for the class or camp. In the example below, we have set a limit of 12…
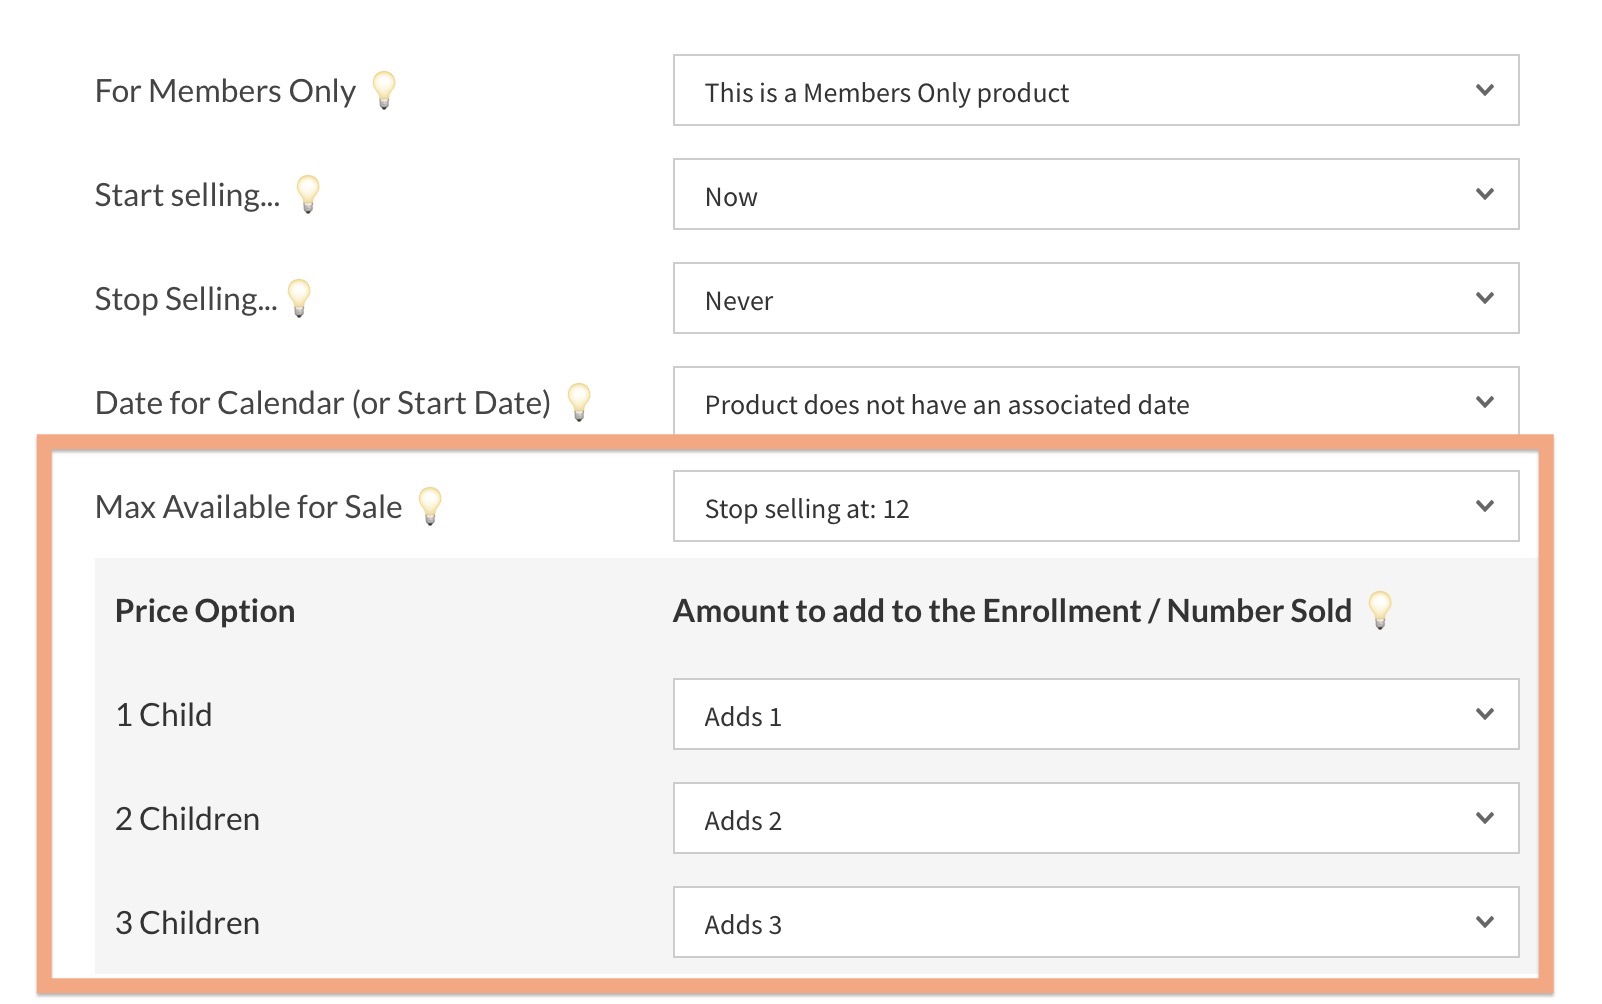
Since our product has Variable Pricing setup we need to define how each price option affects capacity. Be sure the 1 Child option is set to Adds 1. The 2 Children option Adds 2, 3 Children option Adds 3, etc.
Dating the Product
Although our “Perfect Summer Camp” product won’t ultimately be for sale, you probably want to give it a date so we can set a few more properties that will be duplicated out later. Start by setting the Date for Calendar (Start Date) option.
This will save the page and reveal the options seen below…

The “Occurs over multiple days” option allows you to set the length of the camp (i.e. x number more days – up to the end date).
The Days of the Week option allows you to show on the Upcoming Product Schedule page section which days the camp or class is held.
Finally you can set a Start and End Time.
When we duplicate the product, our system will know to shift the Occurs over multiple days so a new end date is based on a new start date.
Duplicating the Initial Product
Save all the changes to your initial product, then head over to Board Member Dashboard > Financial > Product Duplicator.
Select the product you just created and the number of duplicates you would like to make. You will see options similar to the screenshot below…
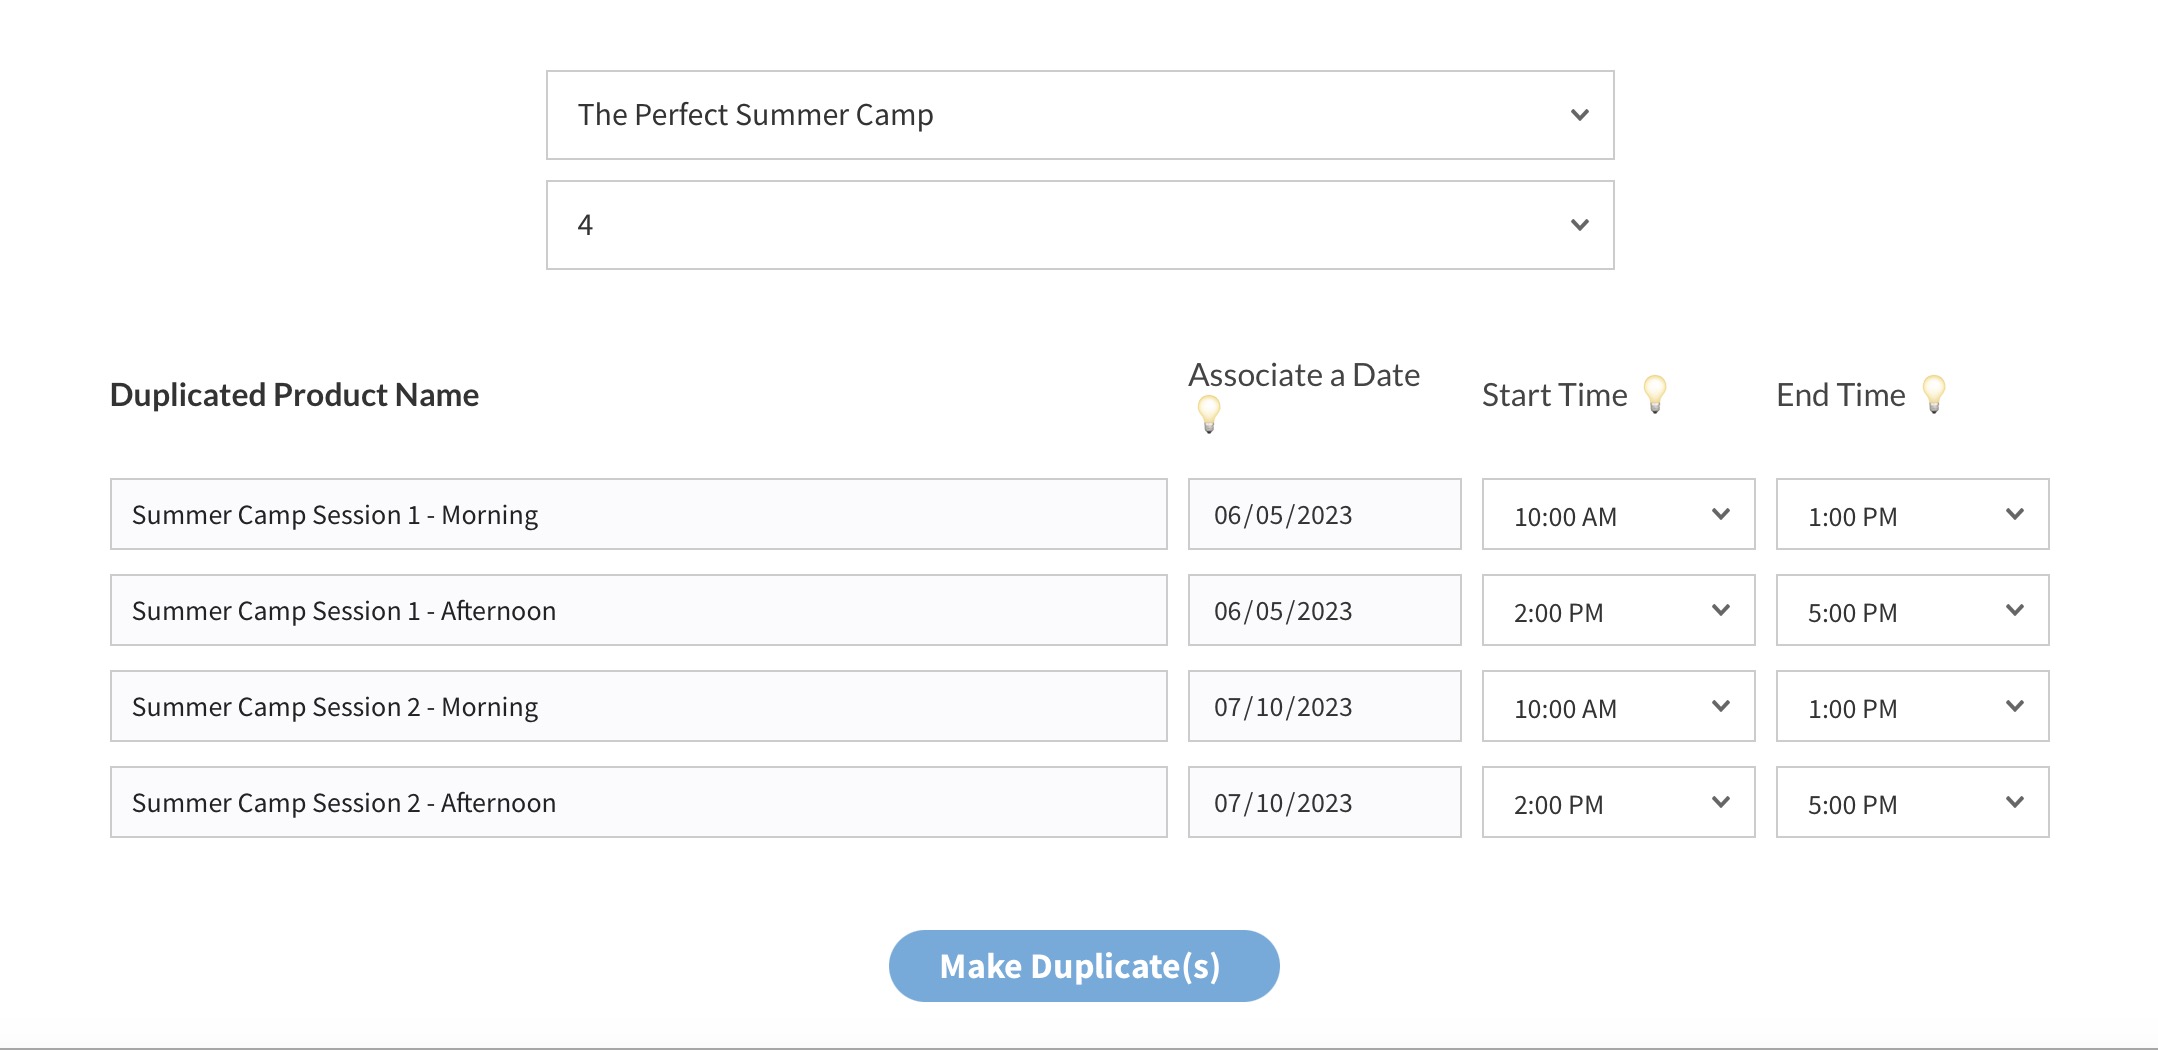
Notice we have completely changed the name of “The Perfect Summer Camp” to something more appropriate. As part of the duplication process we can Associate a new Date, Start Time and End Time.
Duplicates can also have the same date, for example, the screenshot above has a Morning and Afternoon session beginning on the same date, but with different start times.
Create a Page to sell your Camp / Class Products
You can use our Page Creator tools to make a brand new page to sell your Summer Camp products. From the Board Member Dashboard go to Pages & Docs, then Create a Page or Event.
Select the Upcoming Product Schedule option seen below…
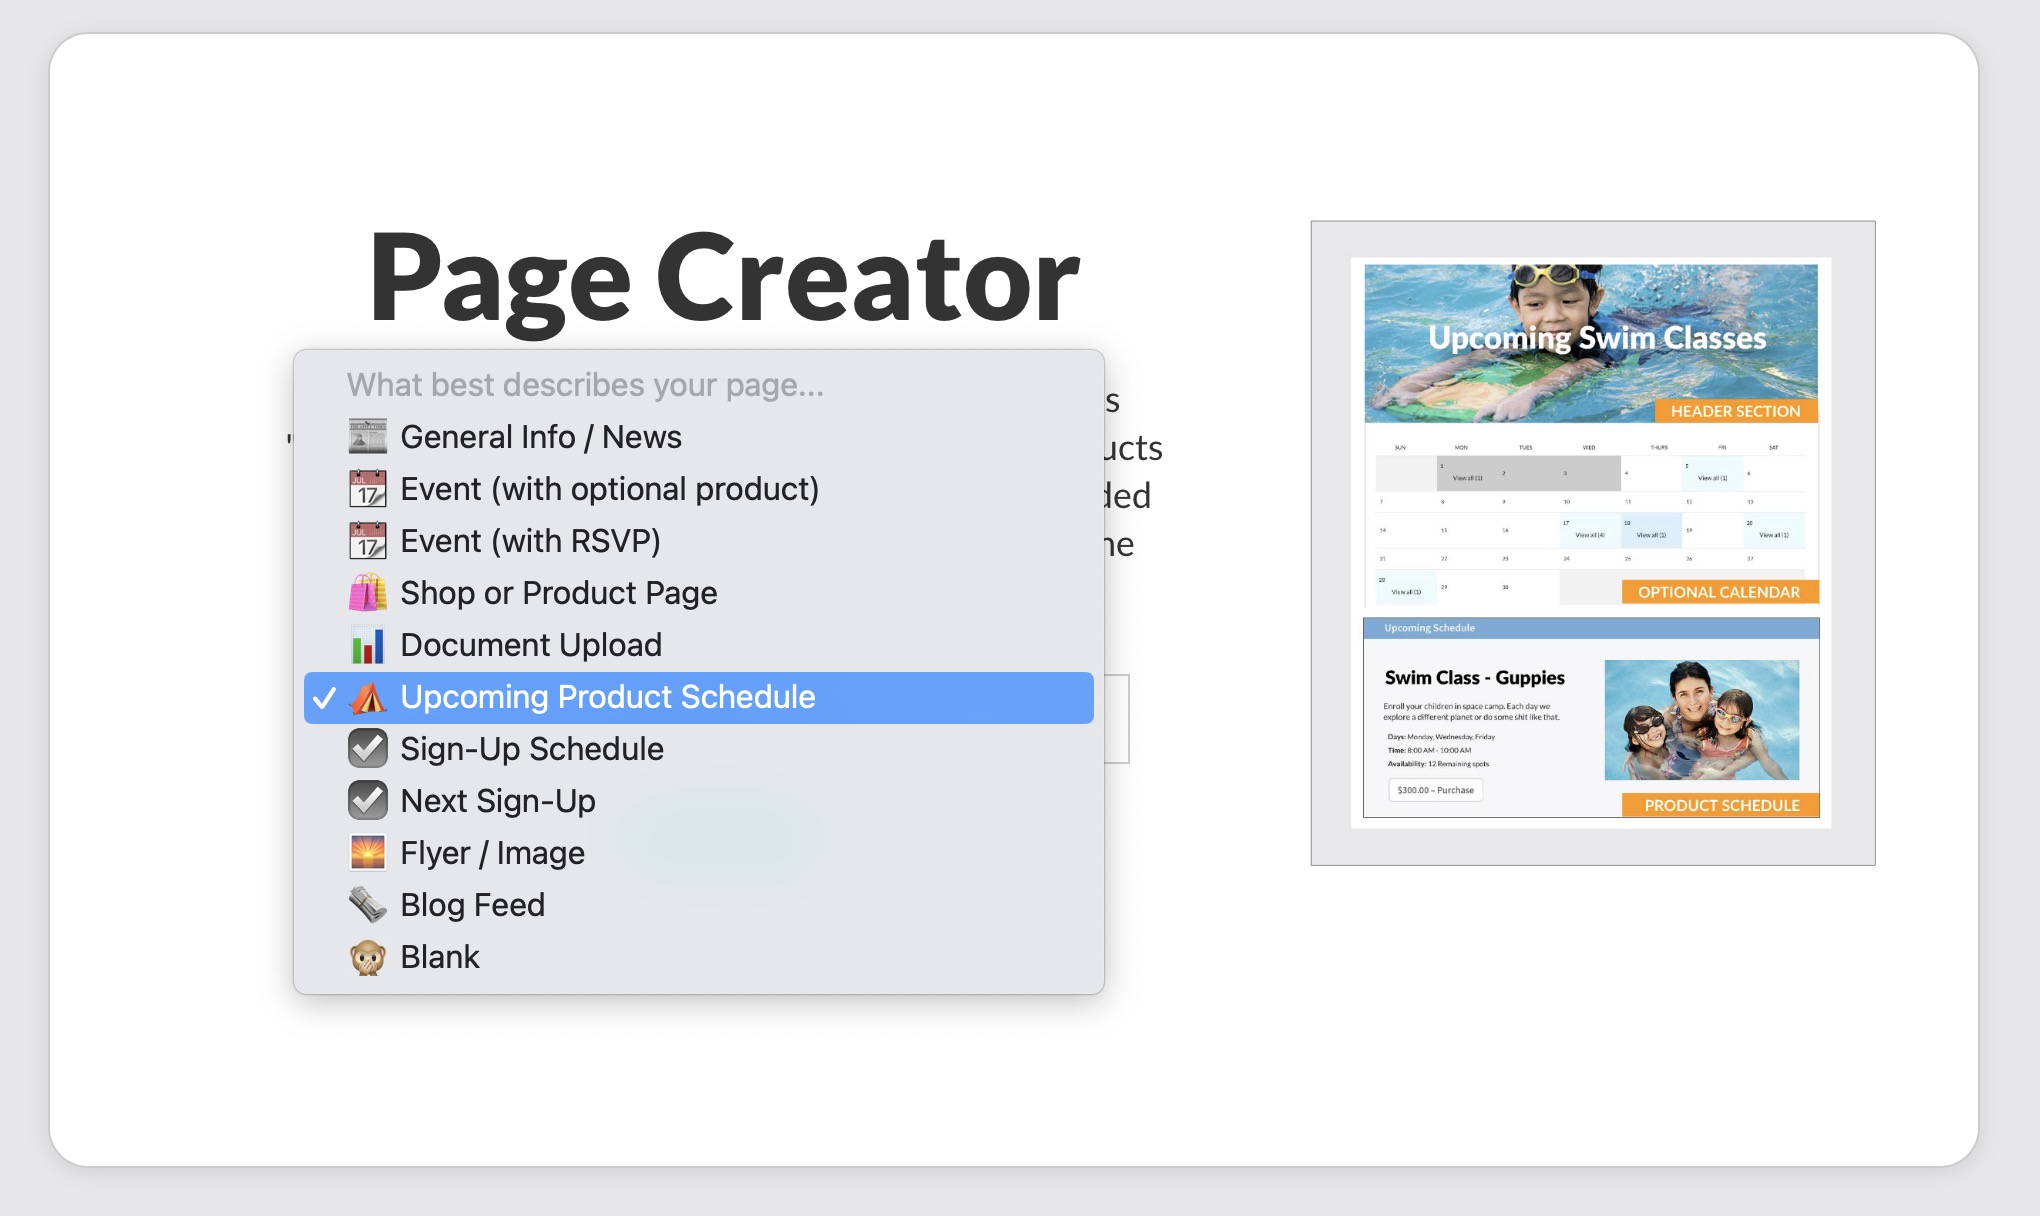
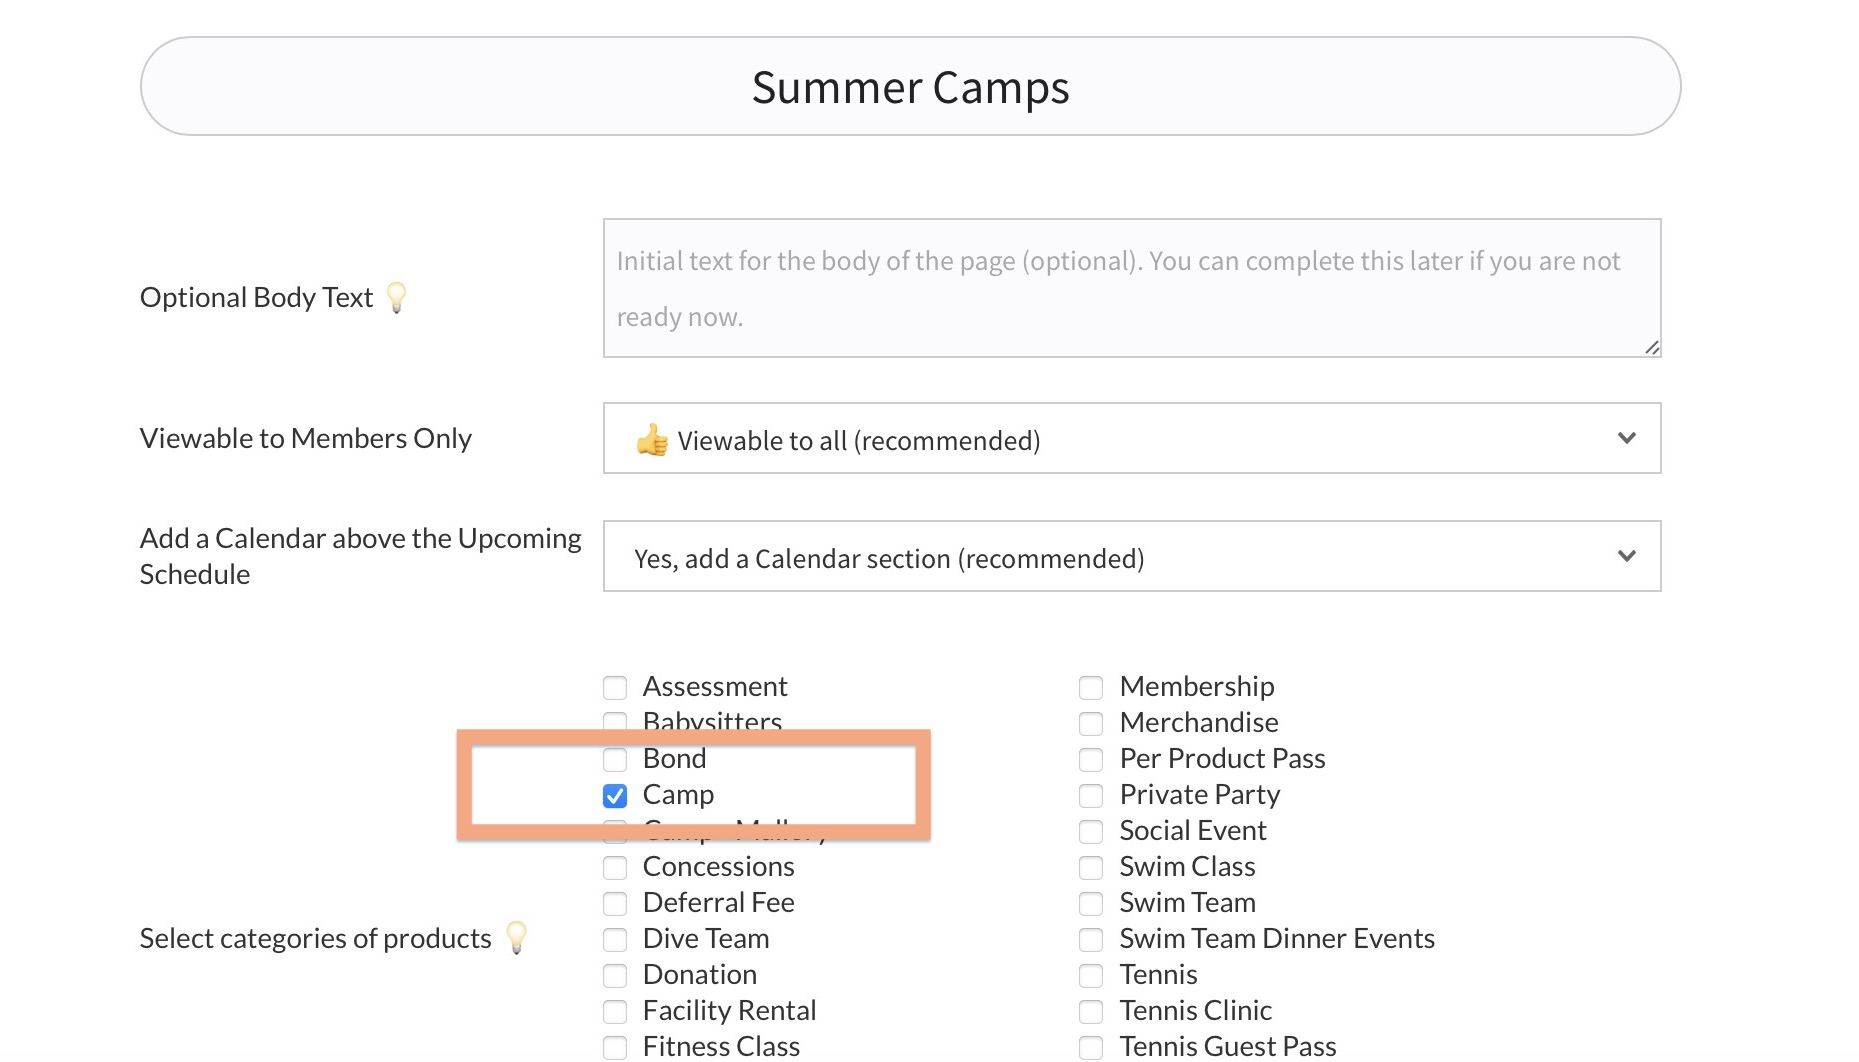
On the next screen, title your page then select the category (or categories) of products to show…
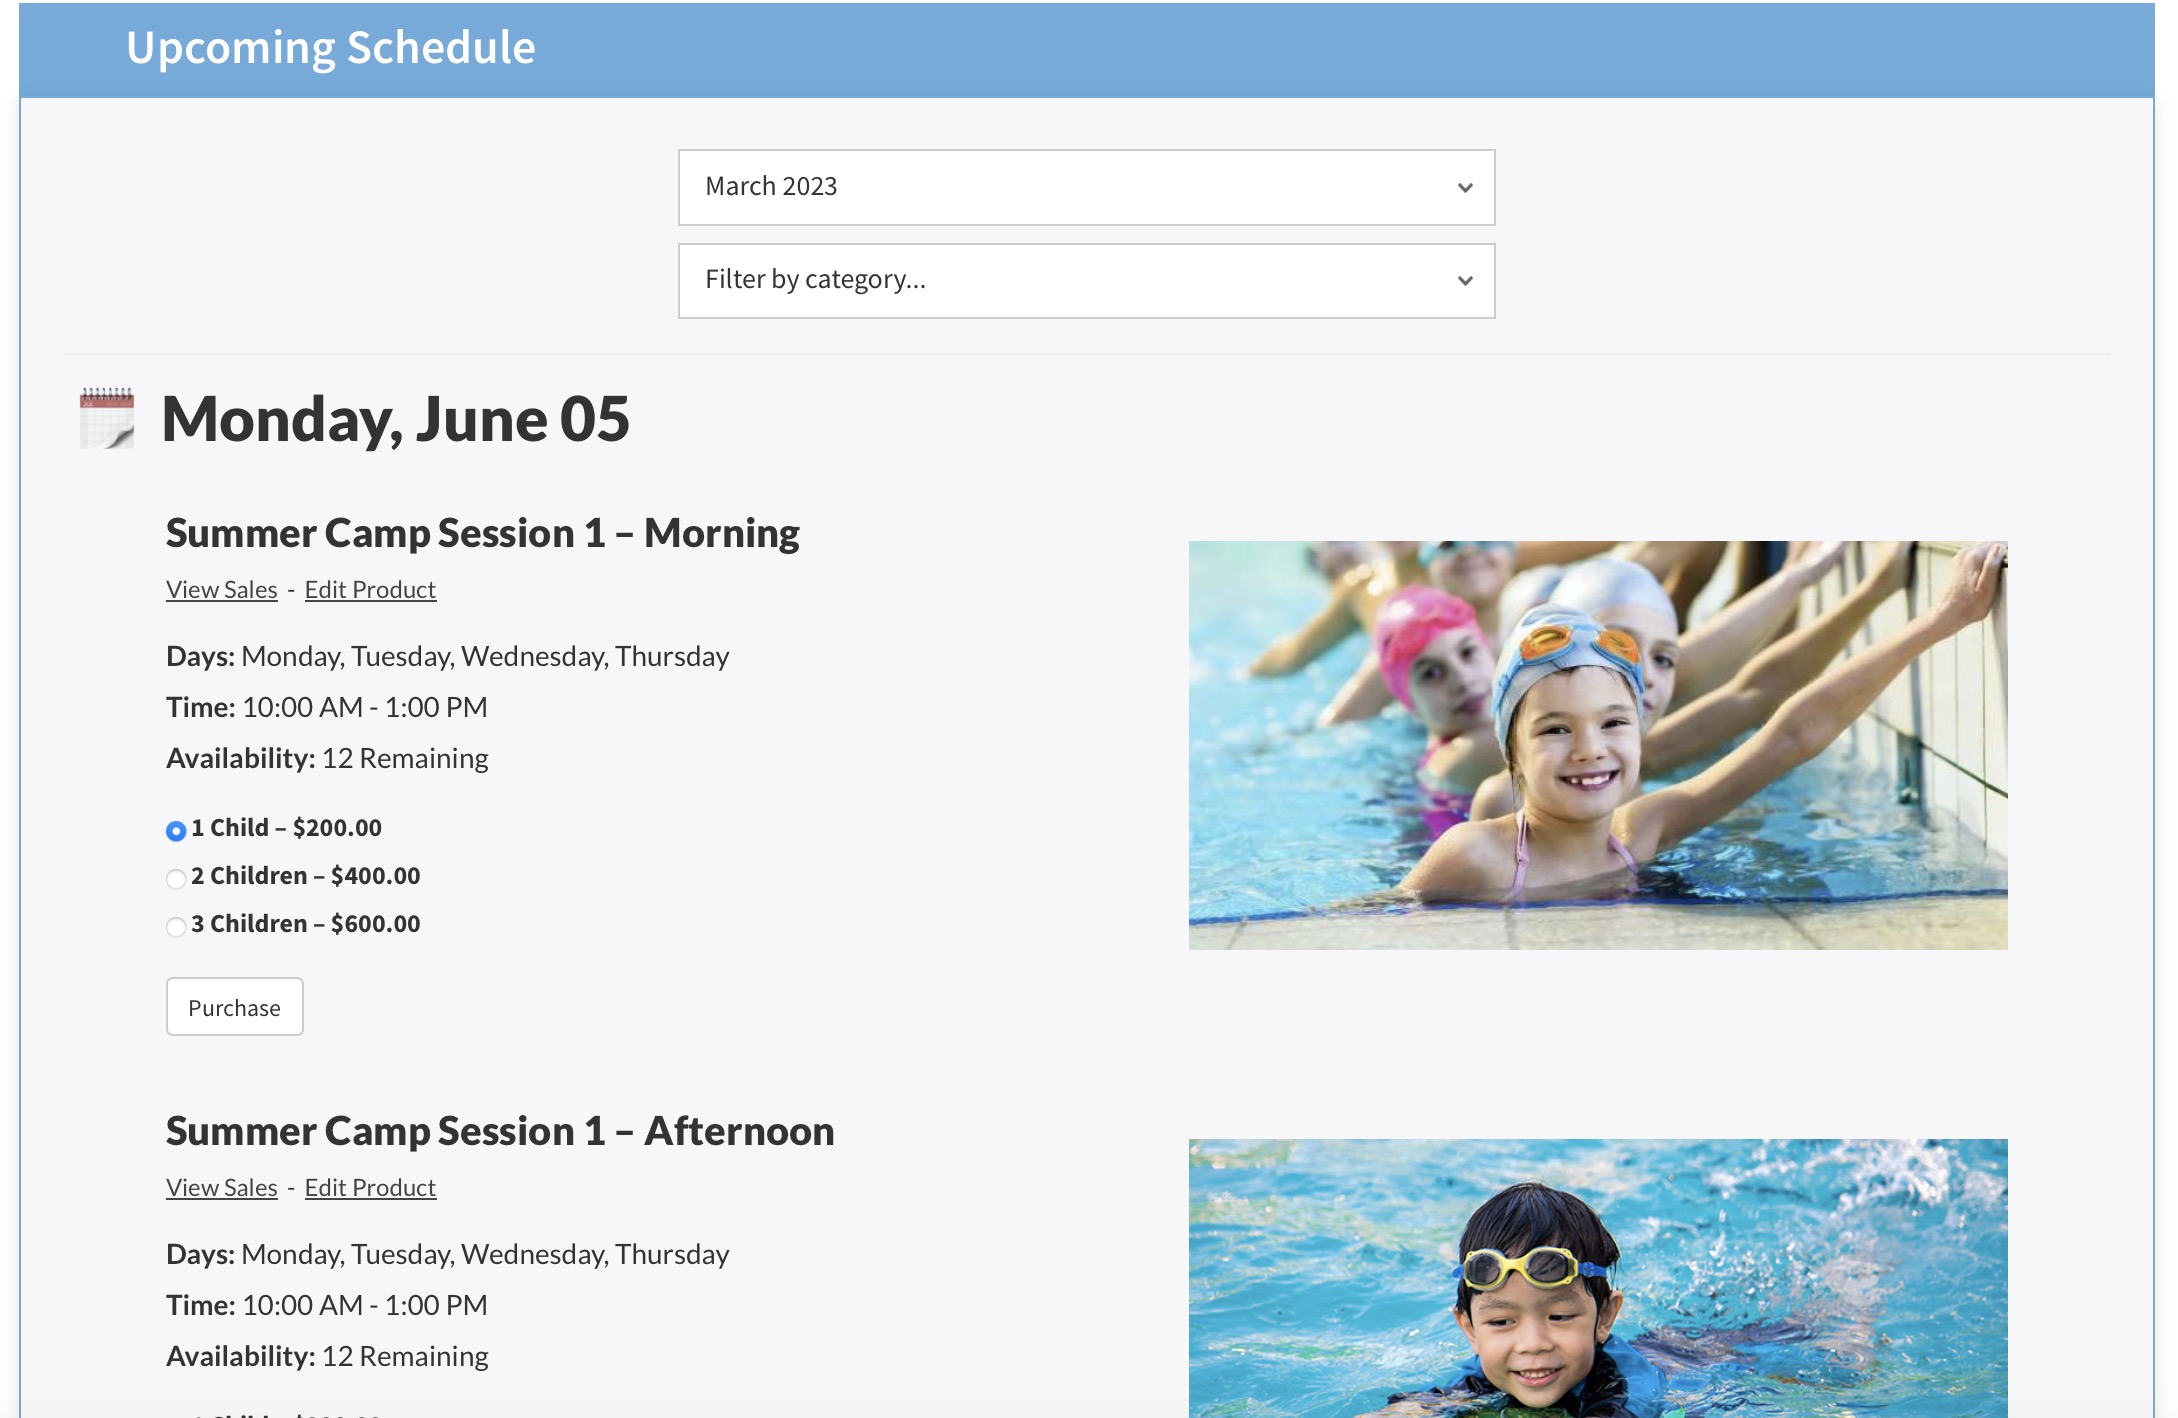
After creating the page you should see something like the Upcoming Schedule below.
If the dummy product you duplicated from is showing, you could back-date it or remove the date entirely so it does not show from the Schedule. You could delete the product but might want to keep it just in case you want to make more duplicates later.
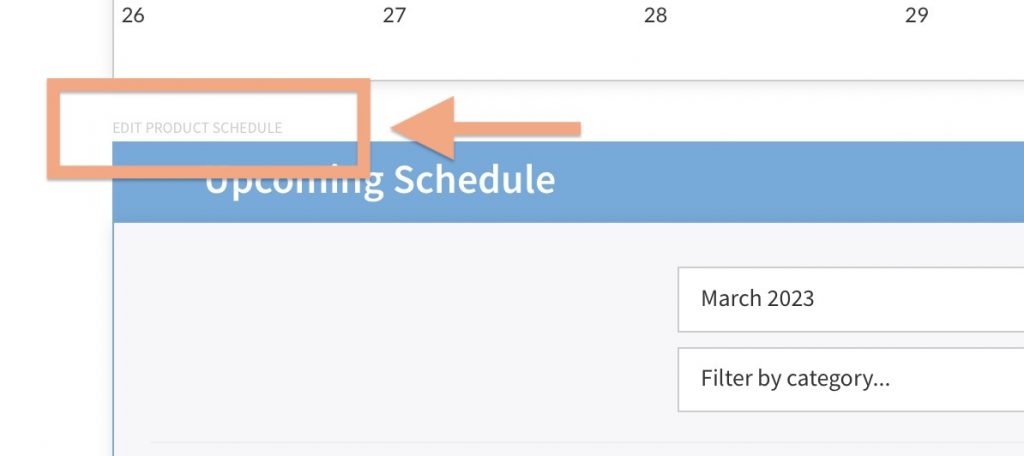
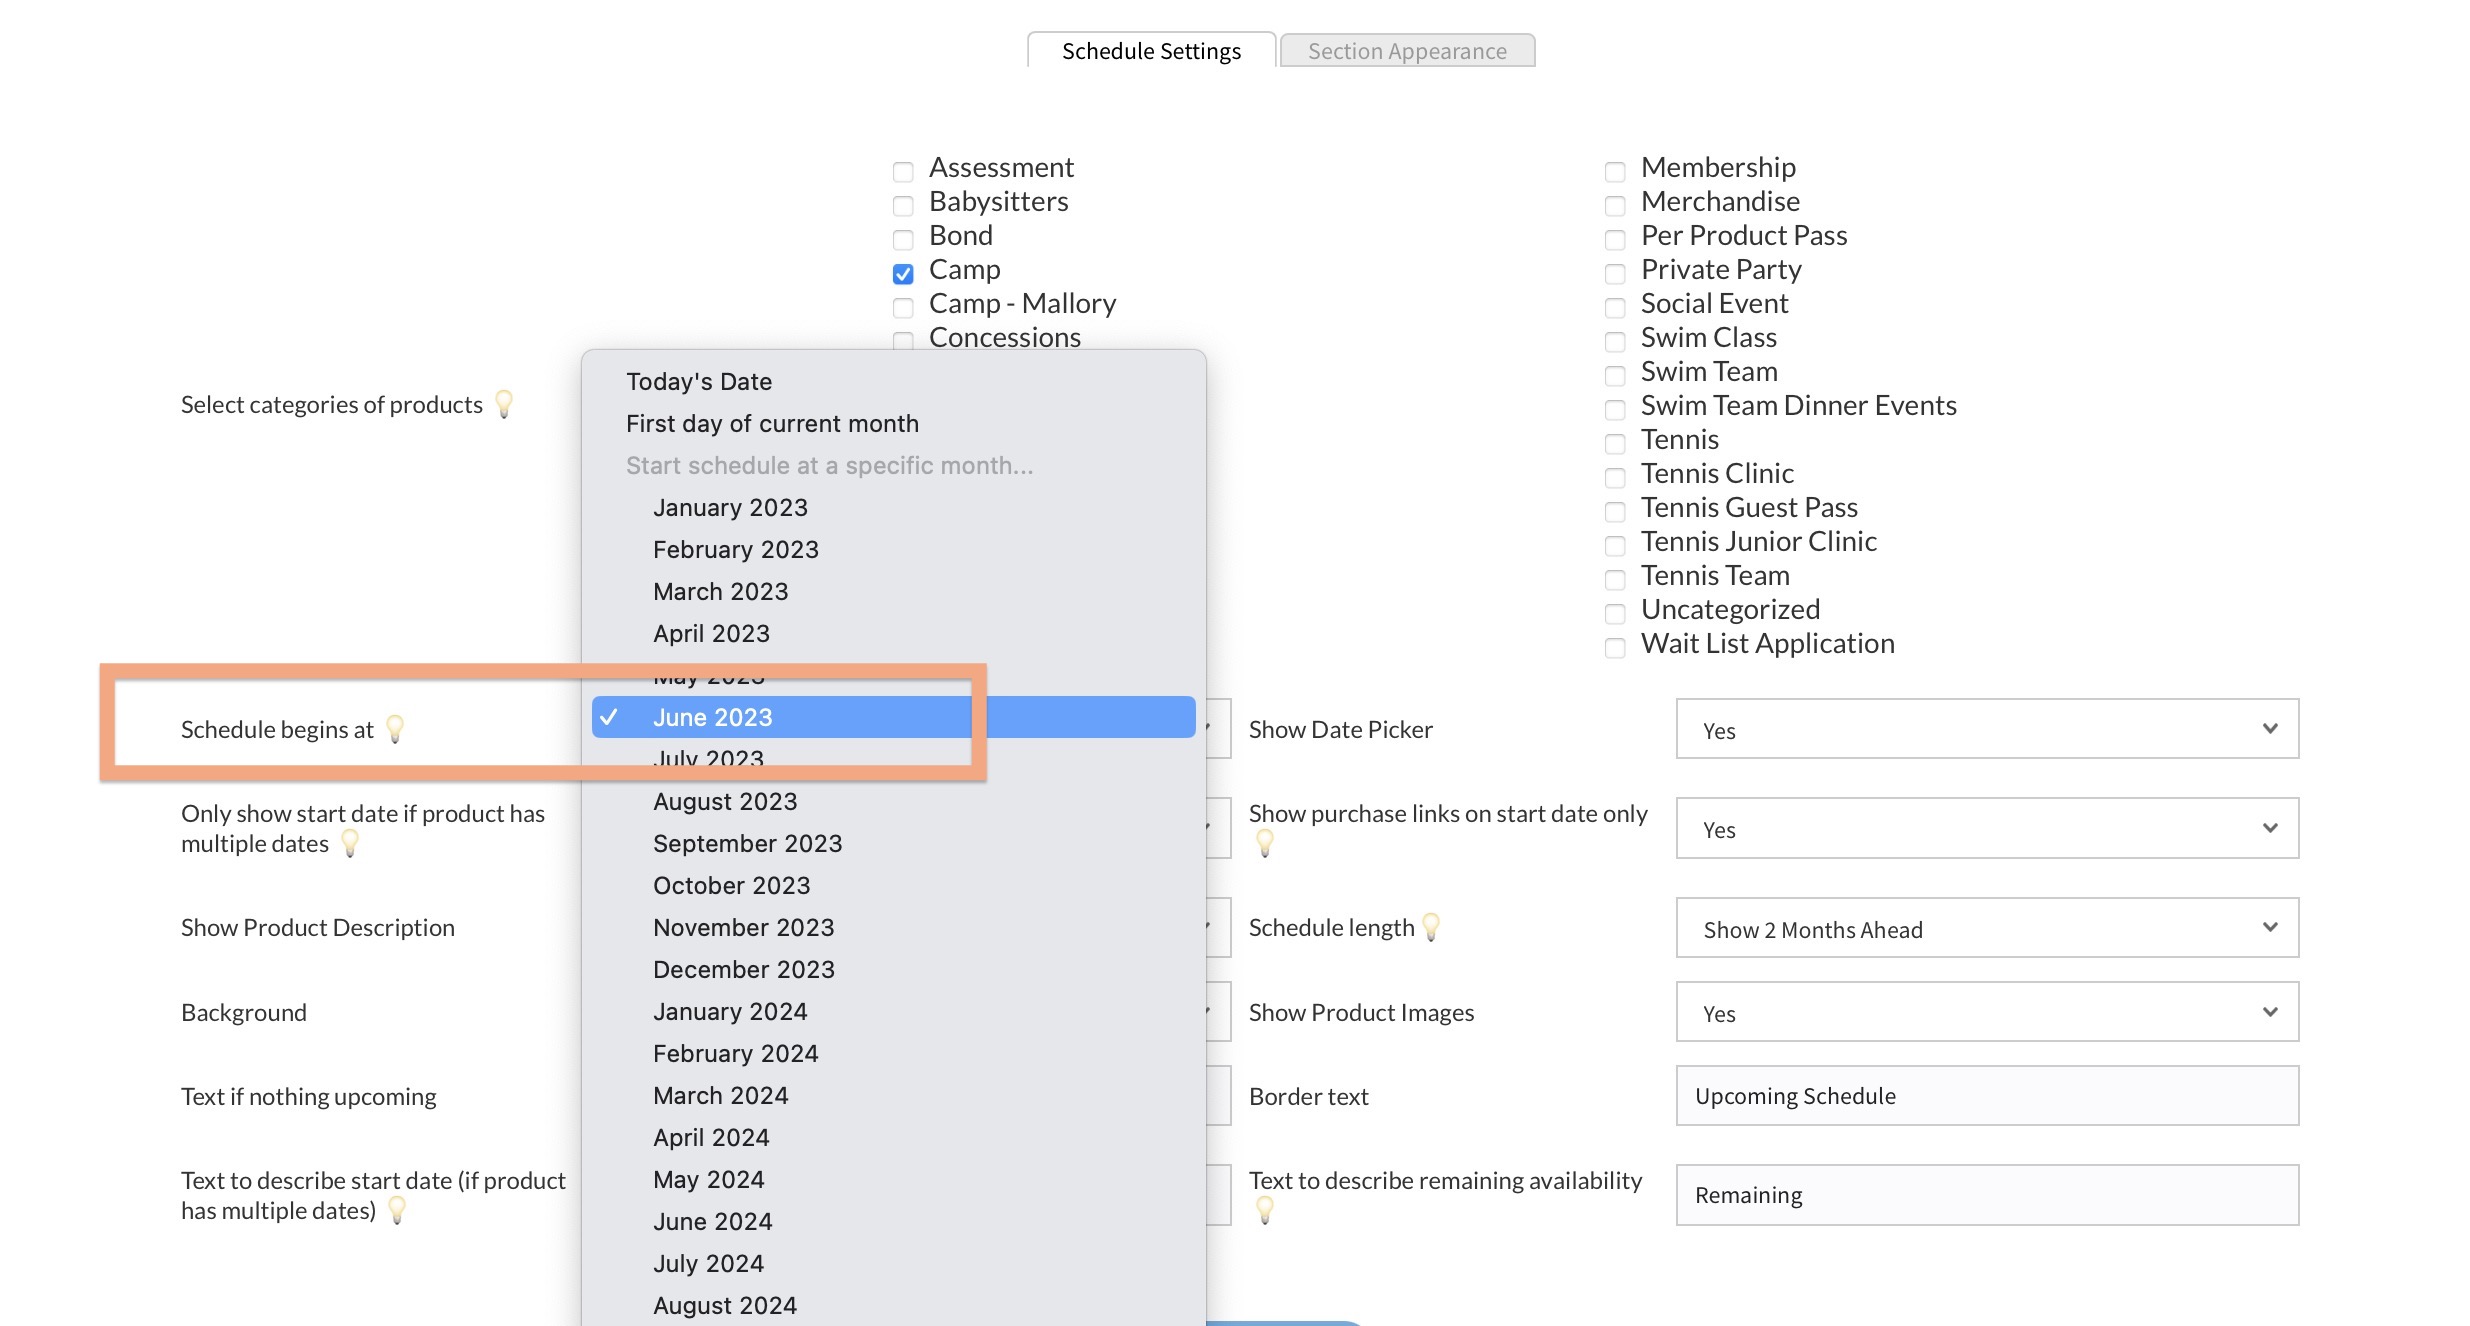
Editing the Upcoming Product Schedule section
The Upcoming Product Schedule section has some customizable settings. You can edit it by finding the link in the screenshot below (look close, its there)…
One setting you may want to change is the “Schedule begins at” property. This allows you to define what month the schedule begins showing products. By the default it is the First day of the current month (“current” as in whatever month the user is viewing the page). You can also chose Today’s Date (which would exclude anything before the current day). Or define a permanent start such as June 2023.
If you want to mix in other Categories of products on one schedule, you can toggle on more. Remember, even if the Category is selected, the products within that Category must have a Date Associated to show on the schedule.
That’s all!